Buying an LED torch can be a bit tricky at times as the person might get confused after having a look at the vast variety of LED torches in the market like LED keyring torches, LED pocket torches and so on. Most people prefer an LED keyring torch as it always remains with a person as people hardly forget their keys these days and hence when the person will require a torch, it will be right in his pocket. While buying a LED torch, a person must look out for its illuminating power, durability and reliability. There are different kinds of torches available in the market if classified by their illuminating power.
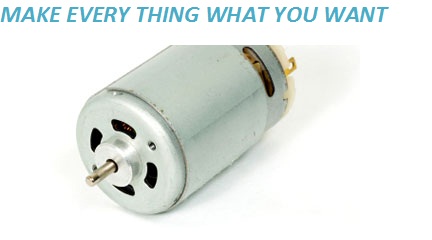
make motors,generators,ups,electronics,tourch light,portable ac and heater,make every thing by yourself,also see in videos
Monday, December 20, 2010
How to Make a Home Built Wind Generator By Troy Johns
In this day an age energy is very much a talking point due to its effect on the environment and also the increasing costs hurting families in these hard financial times. One way to help lower the burden is to create your own power with a home built wind generator. This article is an introduction to what you require and how to make your own wind generator for very little cost and great reward. It is also an ideal project to complete with your children to teach them the science behind wind power as well as keep their mind active with hands on construction.
How to Make Solar Power and Build a Wind Generator From Your Backyard By Darrel Case
Even when the high offices of leading nations push for renewable energy, they refer to the energy issues as looming threats and future problems. No wonder they are not getting the message across. The reality of the situation is that the energy crisis is already right at our doorsteps. Aren't we hit with continuously escalating power bills and breathing in toxic smoggy air already? Enough of just talking the walk, the world needs to take action - now!
The plus-points of renewable energy would be simply overwhelming if only people can just get out of their misplaced comfort zone. Morally and politically, we shouldn't be held ransom by our dependence on conventional fuel like oil and gas. It's everybody's environmental responsibility to help out the
The plus-points of renewable energy would be simply overwhelming if only people can just get out of their misplaced comfort zone. Morally and politically, we shouldn't be held ransom by our dependence on conventional fuel like oil and gas. It's everybody's environmental responsibility to help out the
How to Make Your Own Homemade Wind Generator By Davion Wong
Millions of people around the world today are turning to renewable sources of energy such as homemade wind generator. Mankind's consumption of power is growing rapidly and as the demand increases, the cost of fuel will also increase. This unquenchable thirst for power will also put a tremendous strain on our present sources of energy. Most of our energy needs comes from fossil fuel, which is quite limited in quantity already. The time will come when it will run out and this is something we cannot really prevent. A lot of people are now aware of the benefits of clean and renewable sources of power.
How to Make a Magnetic Generator - Simple Start to Saving Electricity
As the demand for electricity has risen over time, it is just wide for people to find ways to conserve energy and find ways to have alternative sources of electricity. In fact, solar panels are now emerging in the scene these days to conserve electricity and use the free power of the sun instead.
However, the high cost of solar panels has also discouraged some people to go for the solar panels. If you are looking for other alternatives, learning how to make a magnetic generator can be a good one.
As the name suggests, the magnetic generator uses magnets to create free electrical energy that we can also use for our electrical energy needs. In these times that the sources of energy are starting to be used up, it is indeed important for us to find alternatives.
How to Make a Wind Generator to Power Your Household Appliances
Because of the uncontrollable price hikes of conventional energy sources such as fossil fuels, green and renewable energy has become one of the most common subjects in every conversation. People are now focusing on how to make a wind generator that is efficient enough to power off grid homes. The exhilarating technologies that offer a clean and sustainable energy source that is free and off the grid has captured the interest of a lot of individuals. Places or locations that have a stable and high amount of wind are prime spots to build a wind powered generator that will help to supply your household's electrical requirements. Although making a wind generator yourself can be quite a challenge, it is entirely possible.
In making your own homemade wind generator, you should first measure the wind around your property and in the general area using an anemometer. Look for an anemometer that you can easily set up and return by the end of the day. Check the results of your survey by looking at the stats such as the highest wind speed recorded as well as the average wind speed. Make sure to measure the wind speed in various locations several times to establish the best spot to construct your wind generator. Generally, a ten mile an hour wind speed will produce around a hundred watts of electricity for a wind generator system with a four meter blade diameter.
If you carefully observe some of the how to make a wind generator guides, you will learn that you can convert the powered treadmill motor into a stable magnet alternator. Try to break open the housing of the treadmill to access the generator. It should read "permanent magnet motor". Carefully attach the base of the blades from the turbine casing to the flywheel that is securely fastened to the end of the treadmill motor. Put in the blocking diode that will be positioned between the motor and the deep cycle batteries to make sure that it will not drain the batteries.
You can now get a set design so you can start carving your blades. The most crucial features on your propellers are the number of blades you will use as well as the length or diameter. Bear in mind that the larger the blades are, the more wind will be captured by the system, which can generate a greater amount of electricity. However, the larger the blades, the slower they will spin. In other words, large blades are only suited for areas with strong wind speeds.
When assembling your hub, make sure that it is big enough to house the treadmill's power generator, which will be transformed into a permanent magnet alternator. Securely fasten the turbine blades onto the front of the housing and the tail in the back. Carefully weld the permanent magnet motor to the casing for the wind generator hub. If it is possible to attach them without welding, perhaps by using zip ties or other types of connecting materials like a strong adhesive or bolts and screws, then that would be better.
Hook up the appropriate wiring from the generator to the deep cycle batteries. Make certain that when you put the electricity regulator in the circuit, it is between the batteries and the generator. This way, your system can block any excess electricity from going to the batteries and shortening their life span. Now you have done the impossible and learned how to make a wind generator on your own.
To be energy efficient, you must find ways to lessen your energy or power consumption. One of the many ways to do this is by knowing how to make a wind generator. To know more about it, check out http://greenhomeenergynow.com/
Article Source: http://EzineArticles.com/?expert=Matt_Wilkins
Wednesday, November 3, 2010
Wednesday, September 29, 2010
How 3d Glasses Work
How Do 3D Glasses Work?
3D Stereoscopic glasses are nothing new. In fact you had them when you were a kid and probably didn't even know it. Remember the ViewMaster™ that showed all the cool Disney characters in full 3d? The ViewMaster™ allowed you to look at two pictures of the same thing taken from a slightly different view point and tricked your brain into seeing one 3d image.In order to see things in 3D each eye must see a slightly different picture. This is done in the real world by your eyes being spaced apart so each eye has its own slightly different view. The brain then puts the two pictures together to form one 3D image that has depth to it.Still want to know how do 3D glasses work? Keep readingAnaglyphic [ana·glyph·ic /"a-n&-'gli-fik/] adjective -- A stereoscopic motion or still picture in which the right component of a composite image usually red in color is superposed on the left component in a contrasting color to produce a three-dimensional effect when viewed through correspondingly colored filters in the form of spectacles.The mode of 3D presentation you are most familiar with are the paper glasses with red and blue lenses. The technology behind 3D, or stereoscopic, movies is actually pretty simple. They simply recreate the way humans see normally. Since your eyes are about two inches apart, they see the same picture from slightly different angles. Your brain then correlates these two images in order to gauge distance. This is called binocular vision - ViewMasters™ and binoculars mimic this process by presenting each eye with a slightly different image. Now you're learning! Need to know more about how do 3D glasses work? Read on. The binocular vision system relies on the fact that our two eyes are spaced about 2 inches (5 centimeters) apart. Therefore, each eye sees the world from a slightly different perspective, and the binocular vision system in your brain uses the difference to calculate distance. Your brain has the ability to correlate the images it sees in its two eyes even though they are slightly different. If you've ever used a ViewMaster™ or a stereoscopic viewer, you have seen your binocular vision system in action. In a View-Master, each eye is presented with an image. Two cameras photograph the same image from slightly different positions to create these images. Your eyes can correlate these images automatically because each eye sees only one of the images. A 3D film viewed without glasses is a very strange sight and may appear to be out of focus, fuzzy or out of register. The same scene is projected simultaneously from two different angles in two different colors, red and cyan (or blue or green). Here's where those cool glasses come in -- the colored filters separate the two different images so each image only enters one eye. Your brain puts the two pictures back together and now you're dodging a flying meteor! 3D glasses make the movie or television show you're watching look like a 3-D scene that's happening right in front of you. With objects flying off the screen and careening in your direction, and creepy characters reaching out to grab you, wearing 3-D glasses makes you feel like you're a part of the action - not just someone sitting there watching a movie. Considering they have such high entertainment value, you'll be surprised at how amazingly simple 3-D glasses are. The binocular vision system relies on the fact that our two eyes are spaced about 2 inches (5 centimeters) apart. Therefore, each eye sees the world from a slightly different perspective, and the binocular vision system in your brain uses the difference to calculate distance. Your brain has the ability to correlate the images it sees in its two eyes even though they are slightly different. If you've ever used a View-Master or a stereoscopic viewer, you have seen your binocular vision system in action. In a View-Master, each eye is presented with an image. Two cameras photograph the same image from slightly different positions to create these images. Your eyes can correlate these images automatically because each eye sees only one of the images. The reason why you wear 3-D glasses in a movie theater is to feed different images into your eyes just like a View-Master does. The screen actually displays two images, and the glasses cause one of the images to enter one eye and the other to enter the other eye. There are two common systems for doing this: Although the red/green or red/blue system is now mainly used for television 3-D effects, and was used in many older 3-D movies. In this system, two images are displayed on the screen, one in red and the other in blue (or green). The filters on the glasses allow only one image to enter each eye, and your brain does the rest. You cannot really have a color movie when you are using color to provide the separation, so the image quality is not nearly as good as with the polarized system.
The red and blue lenses filter the two projected images
allowing only one image to enter each eye.
Image courtesy of howstuffworks.com
At Disney World, Universal Studios and other 3-D venues, the preferred method uses polarized lenses because they allow color viewing. Two synchronized projectors project two respective views onto the screen, each with a different polarization. The glasses allow only one of the images into each eye because they contain lenses with different polarization. allowing only one image to enter each eye.
Image courtesy of howstuffworks.com


How to make a car
Building the Body of the CarMake sure the remote control car kit includes two axles, four tires and the housing for the handheld remote control device, which will be used to control the carClamp the two axles to the rectangular steel plate. Make sure that the front axle is the one with the pivoting ends, which steers the car. Screw the clamps into place around the axles.Cover the ends of the axles with powdered graphite, and insert the tires onto the axles. Hold the tires in place by screwing washers onto the ends of the axles with the adjustable wrench.Bolt the two-way radio frequency electrical motor to the passenger's side corner on the front of the car's steel plate. Use the wire strippers to remove some of the coating at the end of the motor's lead wire and attach the lead wire to the copper ring around the right side of the front axle. Crimp the ends of the wire around the copper ring using your hands.Strip some of the coating from the motor's steering wire (which is usually red or green) and crimp the ends of the steering wire around the knob on the bottom right of the front axle.Building the Remote Control DeviceGlue two pairs of resistors to the inside wall of the housing of the handheld remote control device using the rubber cement. Leave a space of approximately 1 inch between the two pairs of resistors.Drill a small hole through the wall of the housing in the middle of the 1-inch space, then place the 4-inch steel rod through the holeSnap the rotating steel head with the electrode to the end of the bar that is inside the remote control housing. Snap the plastic knob from the remote control kit to the end of the steel rod outside of the housing. This is the device that will steer the car.Strip some wire coating from the end of the trigger wire and crimp the ends of the wire around one pair of resistors.Close the remote control housing by snapping the two halves together and screw the antenna onto the top of the remote control device. Your homemade remote control car is now ready for use.
How to make a NFS:Most Wanted BMW
How to make a NFS:Most Wanted BMW
Built you own Remote Control car
How does one go about building a dream rc car? Here are a few tips about how to build your own rc car. Radio controlled cars come in different varieties such as electric or nitro - while electric cars are recommended for beginners as they are easier to build and maintain. Advanced modelers prefer to build nitro cars as they provide a greater challenge. RC cars come in various shapes and sizes from battery powered microsizers to the 1/5 scale model DuraTrax FireHammer. Even though rc cars are smaller than full size cars some of them contain sophisticated engineering and they can provide a great building challenge. An important point to keep in mind while building rc cars is the speed one hopes to achieve. While cars with slower speeds are better for beginners, there are many models which cruise at speeds beyond 50mph.
Remote control car kits are the best bet when building a custom rc car. Almost all rc car manufactures provide kits and ready to run (RTR) cars. Very often, the same models offered in kits are also available as RTRs. Kits provide a greater challenge when it comes to building a car as they require the most amounts of effort and time. This can be viewed as an advantage by an avid rc car fan as it can award him with unbeatable experience. This experience can help when upgrading the car or repairing damaged parts. RTR models can be used almost immediately; sometimes the wheels have to be glued on.
ARR models are identical to RTR models but are sold without a radio so you can choose your own.
The Nitro RS4 3 18SS kit from HPI Racing caters to the experienced builder. Kits such the Nitro RS4 3 18SS do not come with radio or electronics so the builder can customize the car with their favorite radio system. The electric 1/18 scale Micro RS4 kit from HPI Racing is one of the electric car kits available on the market. It comes with an HPI TX-2 radio system. The strong steering servo and Micro Pro Control ESC are already plugged into the AM receiver. Another electric rc car kit is the Ferrari F430 from Tamiya RC cars America, Inc.
Off road cars and buggy’s are the most popular rc cars. The main features of off road cars are big tires, full travel suspension and high ground clearance. These features allow off road cars to go almost anywhere. Most off road cars are 1/10 scale, have either four wheel or two wheel drives and can reach speeds of 15-30mph. Electric off road car kits include the 4wd Racing Buggy Dark Impact from Tamiya America, Inc. The HPI Hellfire SS is a nitro off road kit and is targeted at experienced rc modelers.
Tuesday, September 28, 2010

How to Build Homemade Wind Generator
Wind generator consists mainly of 4 parts, which are relatively easy to assembel.
1.Hub and Blades - This might sound like a hard part, but actually it is not, these are the parts that you can order from qualified suppliers, whom im going to introduce later on. The Homemade wind generator manual that I recommend You will also teach you how to build the blades so you dont have to worry about it. Although the price for blades is very low, something like $20.
2.Body - this is the most fun part, because you can customize it like you want. Body is usually made of such a simple thing as vent pipe or etc. I will tell you more about alternative materials later on.
3.Tower - Well the tail part can be a tricky one, but actually dont worry about, you can make it from small TV towers which are easy to obtain or flagpoles which in some cases come for free. The guide also provides information about this part also
4.Tail - This is somewhat the hardest part, because you have to have a sketch or plan how to cut it out. The guide I recommend also has a superb sketch for carving out the tail from wood or PVC plastic.
Well that should show how easy it is to build a homemade wind generator. Although one other keypoint is the time. Actually manufacturing a homemade wind generator wont take up much time, its more about time planning. First buy the guide and read it through, when you have all things sorted out then order the engine and meanwhile fabricate other parts.
How To Buit A Magnetic Generator
In this vedio iam showing you how to made a magnetic generato at home
Saturday, September 25, 2010
MAKE AN 12 VOLT HOME MAKE AIR CONDIONER
TODAY IAM SHOWING,HOW TO MAKE A 12 VOLT AIR CONDITIONER AT HOME
REQUIRED THINGS:
1.Camping Bag or Beach Bag
2.Straws
3.12 Volt AC/DC Fan
4.Ice
INSTRUCTION:
THE INSTRUCTION IS GIVEN IN THIS VIDEO
PLZZ COMENT IT
REQUIRED THINGS:
1.Camping Bag or Beach Bag
2.Straws
3.12 Volt AC/DC Fan
4.Ice
INSTRUCTION:
THE INSTRUCTION IS GIVEN IN THIS VIDEO
ENERGY WAYS TO DRIVE A GENERATOR
THERE ARE MANY WAYS TO DRIVE AN TURBINE
1.WATER(HYDRAL POWER)
2.GAS
3.PETROL
4.DESIAL
4.WIND POWER
5.ATOMIC POWER
6.COLE
1.WATER(HYDRAL POWER)
2.GAS
3.PETROL
4.DESIAL
4.WIND POWER
5.ATOMIC POWER
6.COLE
DIFFRENCE BETWEEN AC AND DC GENERATOR
IN AC GENERATOR THE SHAFT IS CONNECTED TO THE COIL AND ENDS OF THE COIL IS CONNECTED TO THE SLIP RINGS WHICH MADE OF METAL(CONDUCTOR)
 SO IN THIS CASE THE POLARITY IS CHANGES IN A CYCLE TWO TIMES,NEGATIVELY,POSITIVELY
IN DIRECT CURRENT GENERATOR:
"THE COIL IS ATTACHED WITH THE SPLIT RINGS(HALVES RING)SO WHEN A COIL ROTATES,THE CONNECTION OF THE ENDS OF THE COIL CHANGE ITS CONNECTION WITH FIRST ,AND ATTACHED WITH SECOND".IN THIS WAY POLARITY NOT CHANGES"

IN DIRECT CURRENT GENERATOR:
"THE COIL IS ATTACHED WITH THE SPLIT RINGS(HALVES RING)SO WHEN A COIL ROTATES,THE CONNECTION OF THE ENDS OF THE COIL CHANGE ITS CONNECTION WITH FIRST ,AND ATTACHED WITH SECOND".IN THIS WAY POLARITY NOT CHANGES"
TYPES OF GENERATOR
TYPES OF GENERATOR
GANERATOR HAVE TWO TYPES
1.AC CURRENT GENERATOR
2.DC CURRENT GENERATOR
"BUT MOST COMONLY,AC GENERATORS ARE WIDELY USE,IN BUILDINGA,OFFICES,HOMES,FACTORIES,DUE TO MOST APPLIANCES ARE AT AC VOLTAGE"
GANERATOR HAVE TWO TYPES
1.AC CURRENT GENERATOR
2.DC CURRENT GENERATOR
"BUT MOST COMONLY,AC GENERATORS ARE WIDELY USE,IN BUILDINGA,OFFICES,HOMES,FACTORIES,DUE TO MOST APPLIANCES ARE AT AC VOLTAGE"
GENERATOR
GENERATOR:
"A GENERATOR IS A DEVICE WHICH CONVERTS THE MECHANICAL ENERGY INTO ELECTRICAL ENERGY"
"IT IS A REVERSE OF A MOTOR"
HOW A GENERATOR WORKS?
WHEN A SHAFT OF A MOTOR ROTATES BY SOME MECHINICAL MEANS,IN AN MAGNETIC FIELD,IT PRODUCES A CURRENT.
"A GENERATOR IS A DEVICE WHICH CONVERTS THE MECHANICAL ENERGY INTO ELECTRICAL ENERGY"
"IT IS A REVERSE OF A MOTOR"
HOW A GENERATOR WORKS?
WHEN A SHAFT OF A MOTOR ROTATES BY SOME MECHINICAL MEANS,IN AN MAGNETIC FIELD,IT PRODUCES A CURRENT.
Friday, September 24, 2010
MAKE A HOMO POLAR MOTOR HOW?
MAKE A HOMO POLAR MOTOR HOW?
TO MAKE A HOMO POLAR MOTOR YOU SHOULD NOTE THESE THINGS AND THEN FOLLOW TH INSTRUCTION GIVEN IN THE VIDEO
1.TAKE A PIECE OF NORMAL (BUT NOT THIN)SIZE OF COPPER WIRE
2.A AAsize OR A BATTERY YOU NEED
3.A ROUND MAGNETIC
INSTRUCTIONS:
1.IST YOU SHOULD SHAPED THE COPPER WIRE AS DESCRIBED IN VIDEO
(like square,springy)
2.CONNECT THE ROUND MAGNET TO -TIVE END OF THE BATTERY
3.THEN PLACE COIL IN BATTERY IT START ROTATING
So You Have setup Your Own Motor
VIDEO:


PLZZ WATCH IT AND COMMENT It.
TO MAKE A HOMO POLAR MOTOR YOU SHOULD NOTE THESE THINGS AND THEN FOLLOW TH INSTRUCTION GIVEN IN THE VIDEO
1.TAKE A PIECE OF NORMAL (BUT NOT THIN)SIZE OF COPPER WIRE
2.A AAsize OR A BATTERY YOU NEED
3.A ROUND MAGNETIC
INSTRUCTIONS:
1.IST YOU SHOULD SHAPED THE COPPER WIRE AS DESCRIBED IN VIDEO
(like square,springy)
2.CONNECT THE ROUND MAGNET TO -TIVE END OF THE BATTERY
3.THEN PLACE COIL IN BATTERY IT START ROTATING
So You Have setup Your Own Motor
VIDEO:
PLZZ WATCH IT AND COMMENT It.
RESTRICTION OF A HOMOPOLAR MOTOR
RESTRICTION OF A HOMOPOLAR MOTOR

1.IT HAS 1 TURN COIL
2.WHICH LIMITS THEM TO LOW VOLTAGE
3.THIS THING RESTRICTED THEM FROM PRACTICAL USE
1.IT HAS 1 TURN COIL
2.WHICH LIMITS THEM TO LOW VOLTAGE
3.THIS THING RESTRICTED THEM FROM PRACTICAL USE
HOMO POLAR MOTOR
HOMOPOLAR:
Homo means "Same" And Polar Means "WHOSE POLARITY DOES NOT CHANGE"

IN HOMO PLOAR MOTOR MAGNETIC FEILD IS ARROUND THE AXIS OF ROTATION AND CURRENT IS SOME TIME NOT Parallel TO MAGNETIC FIELD

IN THIS TYPE OF MOTOR POLARITY IS NOT CHANG
Homo means "Same" And Polar Means "WHOSE POLARITY DOES NOT CHANGE"
IN HOMO PLOAR MOTOR MAGNETIC FEILD IS ARROUND THE AXIS OF ROTATION AND CURRENT IS SOME TIME NOT Parallel TO MAGNETIC FIELD
IN THIS TYPE OF MOTOR POLARITY IS NOT CHANG
USEAGES OF MOTOR
MOTOR:
IT IS A DEVICE WHICH CONVERTS ELECTRICAL ENERGY INTO MECHINICAL ENERGY
USEAGES OF MOTOR:
MOTOR IS VERY COMON FOR THESE DAYS.
1. ELECTRICAL FAN
2.IN AIR CONDITONERS
3.HEATERS
4.AUTOMOTIVES
5.FACTORIES
6.WASHING MACHINES
ETC
IT HAS COMMON USE IN DAILY LIFE.
IT MAKES HUMAN LIFE EASY
ED EARLEAR THAT WHAT IS MOTOR
IT IS A DEVICE WHICH CONVERTS ELECTRICAL ENERGY INTO MECHINICAL ENERGY
IT IS A DEVICE WHICH CONVERTS ELECTRICAL ENERGY INTO MECHINICAL ENERGY
USEAGES OF MOTOR:
MOTOR IS VERY COMON FOR THESE DAYS.
1. ELECTRICAL FAN
2.IN AIR CONDITONERS
3.HEATERS
4.AUTOMOTIVES
5.FACTORIES
6.WASHING MACHINES
ETC
IT HAS COMMON USE IN DAILY LIFE.
IT MAKES HUMAN LIFE EASY
ED EARLEAR THAT WHAT IS MOTOR
IT IS A DEVICE WHICH CONVERTS ELECTRICAL ENERGY INTO MECHINICAL ENERGY
Thursday, September 23, 2010

DC MOTOR
DC MOTOR IS ATYPE OF MOTOR WHICH OPRATES ON DIRRECT CURRENT VOLTAGE
"IN THIS TYPE OF MOTOR THE COLI IS ATTACHED WITH SPLIT RINGS WITH CRBON BRUSHS"

"IN THIS TYPE OF MOTOR THE COLI IS ATTACHED WITH SPLIT RINGS WITH CRBON BRUSHS"
AC MOTOR

CONSTRUCTION:
1.A COIL(made from conductor)
2.Slit Rings(A metal ring)with carbon brushes
3.Permanent Magnet
4.AC SUPPLY
PRINCIPLE IS THE SAME AS DESCRIBE EARLER
TYPES OF MOTOR(AC&DC)
Types Of Motor:
 DC Motor:
IT op rates on DC Supply(Direct Current )

- Ac Motor
Ac Motor:
Ac Motor is oprates at Ac Current(Alternating Voltage)
IT op rates on DC Supply(Direct Current )

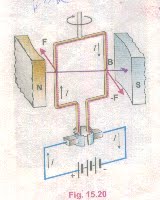
What Is Motor?How it Works
MOTOR?
"IT IS A DEVICE WHICH CONVERTS A ELECTRICAL ENERGY INTO MECHINICAL ENERGY"
HOW A MOTOR WORKS?
" THE PRICINPLE OF A MOTOR IS BASED ON PRINCIPLE OF A TORQUE ON A CURRENT CARRING COIL"
WHEN A CURRENT CARRING COIL IS PLACED IN AMGNETIC FIELD IT EXPERIENCE A FORCE
 T=BIMACOSA
Due to which tow equal and opposite force F1,F2 which are in opposite direction produce couple which produce coil and Motor Starts Running
"IT IS A DEVICE WHICH CONVERTS A ELECTRICAL ENERGY INTO MECHINICAL ENERGY"
HOW A MOTOR WORKS?
" THE PRICINPLE OF A MOTOR IS BASED ON PRINCIPLE OF A TORQUE ON A CURRENT CARRING COIL"
WHEN A CURRENT CARRING COIL IS PLACED IN AMGNETIC FIELD IT EXPERIENCE A FORCE

Due to which tow equal and opposite force F1,F2 which are in opposite direction produce couple which produce coil and Motor Starts Running
Subscribe to:
Posts (Atom)